Getting Start Arduino With PlatformIO
สำหรับคนที่เคยเขียน Arduino มาก่อนจะคุ้นชินกับ Arduino IDE มากว่า แต่สำหรับคนที่ใช้ชีวิตอยู่บน Terminal ผมแนะนำตัวนี้เลย PlatformIO เป็น project management ก็เหมือนกับ Arduino IDE นั้นและ ที่มี Lib พื้นฐานมาให้ แต่เพียงดู Old School ก็เท่านั้น
ก่อนอื่นก็ต้อง Install กันก่อน ผมแนะนำให้ลงผ่าน pip ของ python ครับ นั้นแค่เราต้องมี pip python ก่อน
$ wget https://bootstrap.pypa.io/get-pip.py
$ python get-pip.py
Install PlatformIO ผ่าน pip
$ pip install -U platformio
$ platformio --version
ถ้าได้ เลข version มาก็ แสดงว่าทำงานได้!
เสร็จแล้วต่อ board Arduino เข้ากับคอมเราได้เลย ซึ่งของผมจะเป็น board UNO
ก่อนจะ initial project เราต้องทำการ search board ของเราก่อนว่า platformio มี dependencies ต่างๆ support แล้วรึยัง
$ platformio boards uno

Platform: atmelavr
--------------------------------------------------------------------------------
Type                  MCU            Frequency  Flash   RAM    Name
--------------------------------------------------------------------------------
uno                   atmega328p     16Mhz     31kB    2kB    Arduino Uno
sparkfun_digitalsandbox atmega328p     16Mhz     31kB    2kB    SparkFun Digital Sandbox
uview                 atmega328p     16Mhz     31kB    2kB    SparkFun MicroView
sparkfun_redboard     atmega328p     16Mhz     31kB    2kB    SparkFun RedBoard

Platform: espressif
--------------------------------------------------------------------------------
Type                  MCU            Frequency  Flash   RAM    Name
--------------------------------------------------------------------------------
espduino              esp8266        80Mhz     4096kB  80kB   ESPDuino (ESP-13 Module)

Platform: microchippic32
--------------------------------------------------------------------------------
Type                  MCU            Frequency  Flash   RAM    Name
--------------------------------------------------------------------------------
uno_pic32             32MX320F128H   80Mhz     124kB   16kB   Digilent chipKIT UNO32
chipkit_wf32          32MX695F512L   80Mhz     508kB   128kB  Digilent chipKIT WF32
chipkit_uc32          32MX340F512H   80Mhz     508kB   32kB   Digilent chipKIT uC32
จะเห็นว่ามี uno support แล้ว ทีนี้เราก็มา Initialize project กัน
$ mkdir blink
$ cd blink
$ platformio init --board uno

The current working directory *** will be used for the new project.
You can specify another project directory via
`platformio init -d %PATH_TO_THE_PROJECT_DIR%` command.

The next files/directories will be created in ***
platformio.ini - Project Configuration File. |-> PLEASE EDIT ME <-|
src - Put your source files here
lib - Put here project specific (private) libraries
Do you want to continue? [y/N]: y
Project has been successfully initialized!
Useful commands:
`platformio run` - process/build project from the current directory
`platformio run --target upload` or `platformio run -t upload` - upload firmware to embedded board
`platformio run --target clean` - clean project (remove compiled files)
ตรงนี้เราจะได้ file structure ออกมาประมาณนี้
$ tree .
.
├── lib
│   └── readme.txt
├── platformio.ini
└── src
    └── main.cpp
ตอนนี้ไฟล์ที่เราสนใจมีอยู่ 2 ไฟล์ คือ platformio.ini กับ main.cpp
ซึ่ง platformio.ini จะใช้เก็บ configuration ต่างๆ
$ cat platformio.ini
#
# Project Configuration File
#
# A detailed documentation with the EXAMPLES is located here:
# http://docs.platformio.org/en/latest/projectconf.html
#

# A sign `#` at the beginning of the line indicates a comment
# Comment lines are ignored.

# Simple and base environment
# [env:mybaseenv]
# platform = %INSTALLED_PLATFORM_NAME_HERE%
# framework =
# board =
#
# Automatic targets - enable auto-uploading
# targets = upload

[env:uno]
platform = atmelavr
framework = arduino
board = uno
targets = upload
ในที่นี้ผมเพิ่ม บรรทัดสุดท้ายเข้ามา คือ targets = upload เพื่อตอนสั่ง run จะได้ upload code ใหม่ลงไปยัง board เลย
ต่อมาคือหัวใจหลัก เป็นไฟล์ที่จะให้ control ให้ board เราทำงานอย่างที่เราต้องการ ครั้งนี้ basic เลย เราจะเขียน code control ไฟกระพริบบน UNO
$ cat main.cpp#include "Arduino.h"
void setup() {
pinMode(13, OUTPUT);
}
void loop() {
digitalWrite(13, LOW);
delay(1000);
digitalWrite(13, HIGH);
delay(1000);
}จาก code จะสั่งให้ pin เบอร์ 13 ติด/ดับ ด้วยการส่งสัญญาณ HIGH and LOW
พอเราได้ code แล้ว เราลองมา run กันดูครับ (คำสั่ง run จะไปอ้างอิงตาม configuration ของ platform.ini และถ้า run โดนไม่มี parameter ตามหลัง จะ run ทุก env ใน platform.ini)
$ platformio runถ้าเราไม่ได้ set targets = upload ใน platformio.ini เราจะต้องมาสั่ง uplaod อีกที
$ platformio run -t upload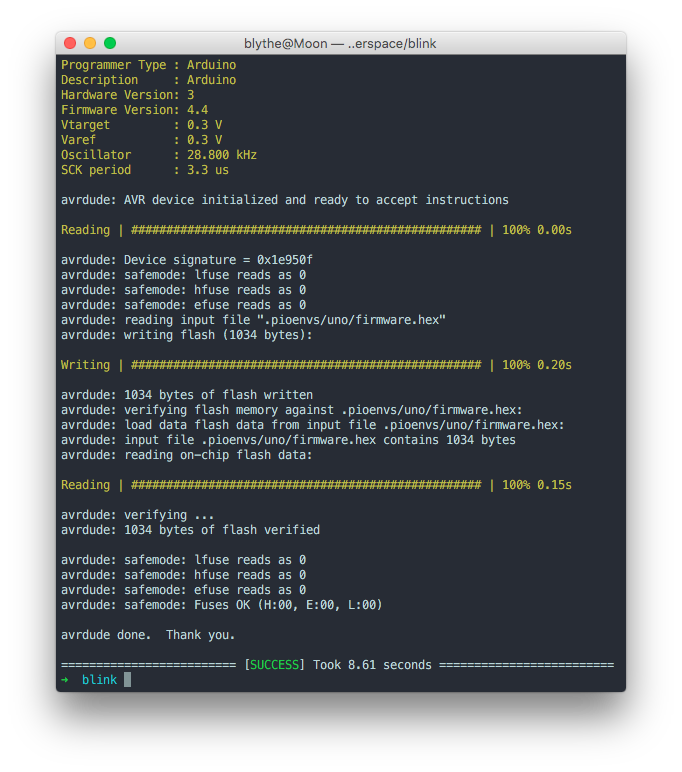
BinGO! ได้ไฟกระพริบตามที่ต้องการแล้ว